DIY Home Renovation: do it yourself or drowning in yuck?
As summer turns to fall, the DIY home renovation at #L2HQ continues. We’ve had a very wet summer here in Indianapolis, which has affected both the painting contractor and my side of the exterior project work – ultimately affecting the entire project schedule. For reference, here is where L2HQ started at the beginning of July this year.
The painter started the process just after the 4th of July with paint removal. The home still has the existing 125-year-old siding and cedar shingle on it, so it was important to treat the wood kindly during the removal process. Using a combination of infrared lights and hand sanders, the paint was slowly removed to bring it down to the wood face. This also meant that every time it rained, we had to wait at least a day for the wall face to dry before they could start again. Slowly but surely, the paint was removed and the siding started to show.
The same rain issues then prolonged the priming process. With rain hitting the recently exposed wood siding, we had to wait for the wood to dry out before applying primer to the wall face. Now we’re in late October, still fighting rain, and trying to get the remainder of caulking done before winter sets in. There’s about 400sf of priming left to do, so I’m hopeful it will wrap up soon. While I’m enjoying the simple minimalism of white primer everywhere, I’m looking forward to seeing some color on the house again – mostly because I can’t wait to see my ideas become a reality!
Outside of trying to make sure the painter is on site when he’s supposed to be (why is this a consistently hard thing with tradespeople?), the HOME portion of this latest project in the DIY home renovation has been very minimal on the “do it yourself” aspect. The same cannot be said for the other portion of the exterior project – the deck.
The deck has been a DIY home renovation labor of love, sweat, tears, and curse words. When I started the deck renovation, the goal was to save as much of the decking as possible for the new horizontal privacy fence and potentially reuse the vertical posts from the existing structure for the new deck. Have you been following along on the inspiration posts and taking guesses as to what the new deck and fence will look like? For reference, here’s a sketch that shows the assumed installation stages of the old/previous deck.

What I learned in the demo process is that the builder of the newer portion of the deck cut more corners than the builder of the older portion of the deck. The same can be said for pretty much everything I’ve encountered in this DIY home renovation, older =craft. newer = crap. I’m trying to go back with craft – it’s my design lab, after all. For example, the newer deck posts, while buried in concrete, were then covered with dirt. The wood wasn’t treated, so one of the posts literally sheared off at the ground plane when I was working near it the other day. So much for being able to reuse the vertical posts. The decking boards also were end nailed into the joists – no screws, no nothing. It made it super easy to remove the wood and cleanly reuse it for decking, but this is also one of the reasons I was putting down a new deck to start with, the boards were popping loose and becoming a trip hazard.
Every available weekend since the beginning of July, I’ve been taking up sections of the deck. I had to slow down to provide access for the painter, and then wait for new electrical to be installed to the house (side note: hooray for upgraded service! 200amps! and it’s buried!), but I strategically moved through the deck removal process. I kept decking boards that were long enough or in good enough condition to reuse, and the same for the joists. I also kept the upper deck in place – assuming it would be taken out at the last minute before the new deck went in to provide continued access to the back door. And then timelines started getting tight and it became the end of October in the blink of an eye.
As it stands right now, the deck portion of the DIY home renovation is being put on hold to prep for winter. Outside of taking up the last 8 posts (because they are in the area where the new patio will be), I decided that it wasn’t worth the time and cost to put down the new ipe deck just in time for winter to take its toll. The soil needs to settle at the post removal and electrical trenching path so that the patio doesn’t heave, and I have other work that can be done in the meantime. Buttttt…I know you’re eager to see what the plan is for the deck, so here’s a sneak peek.
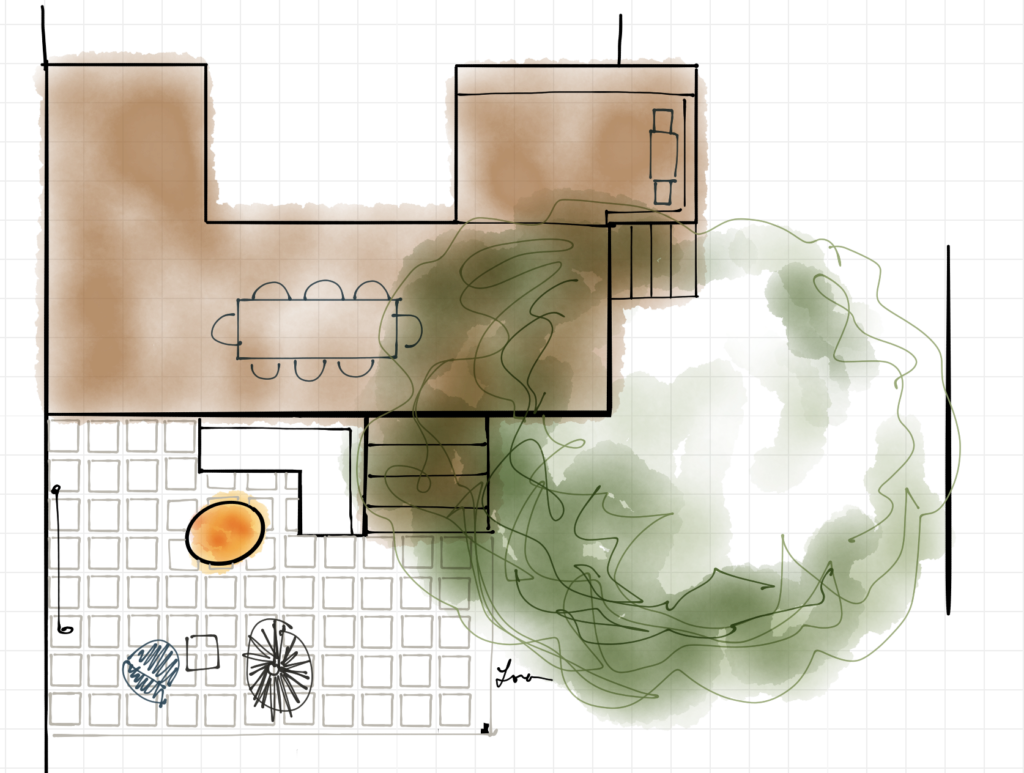
The upper deck will stay at the height of the back door and become the grill/food prep space and the only area that will have a railing (that also doubles as privacy from the street). You will then take one step down (instead of two) to the “dining” portion of the new back deck, which will also wrap around into the north alcove of the house along the property line. This allows the new north window for the future kitchen to also become a pass-through window, if needed. From the ipe deck at the dining level, wide steps will take you down to the new patio area, made from concrete pavers and crushed granite. This will be the social space where many future nights will be spent hanging out with friends and family, reading in the afternoon sun, or watching a movie against the backdrop of the new privacy fence. Oh – and bonfires! Duh.
So what have I learned in this latest DIY home renovation project?
I learned that I’m getting more patient. Yeah, I’m sure my sister and my dad laughed at that comment, but I will be leaving a project unfinished for the first time in my life this winter. Young Lora would have been furious at a project unfinished, but I’m beginning to understand the timing of things and the importance of using the schedule to my advantage to ensure quality that lasts. I’m taking up a crap deck…I don’t want to rush it and end up putting a crap deck back. No one wins when you do that, but young Lora would have thought that no one wins when a project goes unfinished. So…I’m getting more patient. I realize that this DIY home renovation thing is a long game…and I’m in this for the long haul.
I learned that family willing to help is priceless – free labor! But I also learned that I am capable of doing a lot of it myself…though I guess that’s not necessarily a new learning as much as a reaffirmation. That whole DIY thing? I’ve got that down pat. There was something so calming about the process of waking up, making coffee, and tearing into a project until your muscles couldn’t take any more and your stomach growled for dinner. The future moments spent relaxing over a bottle of wine with friends on the new deck will be even more sweet, knowing how much effort I put into this latest DIY home renovation.
I learned that the difference between a DIY that’s “do it yourself” and a DIY that’s “drowning in yuck” is a matter of weather and perspective. You can’t help the former, which makes the latter really important. Plan ahead, continue to check in, and keep a smile… and your DIY home renovation will be done before you know it. Or at least by next spring 😉

If you’d like to see old DIY home renovation projects at #ThisOldHouse, go here.